
SockStitch KAL - Rijel's Never Gonna Knit These Socks

Woo! It's finally here - CAST ON DAY! Usually my favorite day of any week, and most DEFINITELY my favorite part of this week since I get to start socks. My first love.
To get started, we have to deal with gauge. Wah wah... I know. No one likes to make gauge swatches. Well, almost no one. I'm a goober and I love them and will shout from the rafters how much I love to knit gauge swatches but it's usually met with sneers of derision so I've stifled myself and now only proclaim it on social media.
But before we get down to the brass tacks (what on earth does that mean, anyway?) let's give a HUGE shout out to the wildly talented Judy, chief dyer and mastermind behind The Kiwipop Studio who is providing the yarn for this KAL in the SockStitch boxes. And major KUDOs goes out to Megan of PostStitch for putting together this collaboration between Judy and me - this KAL wouldn't be happening without her!
Why Gauge?
If you're not someone who has ever worked with gauge swatches before (yes, I'm looking a YOU!) cast your dispersions aside and get on board for me, just this once. Hats can be fudged. I rarely bother with gauge swatches for shawls and scarves. But socks? You need to know your gauge. If you don't, well, plainly put, the socks won't fit. And what's the point if they don't fit, right? Right! So I've knit a gauge swatch, in the round using my preferred needles. Why, you ask, did I knit a gauge swatch when I've already knit and designed these socks? Because I'm using different yarn. And different needles. So, I did it.
I cast on 60 sts. I worked 6 rnds of garter in the round (knit 1 rnd, purl the next round, repeat) and then worked 25 rounds in stockinette, and finished with another 5 rnds of garter. Why the garter? I think it's easier to measure a swatch when the top and bottom aren't curling but they're not necessary. You could just knit 30 or 35 rounds in stockinette and get the same result.
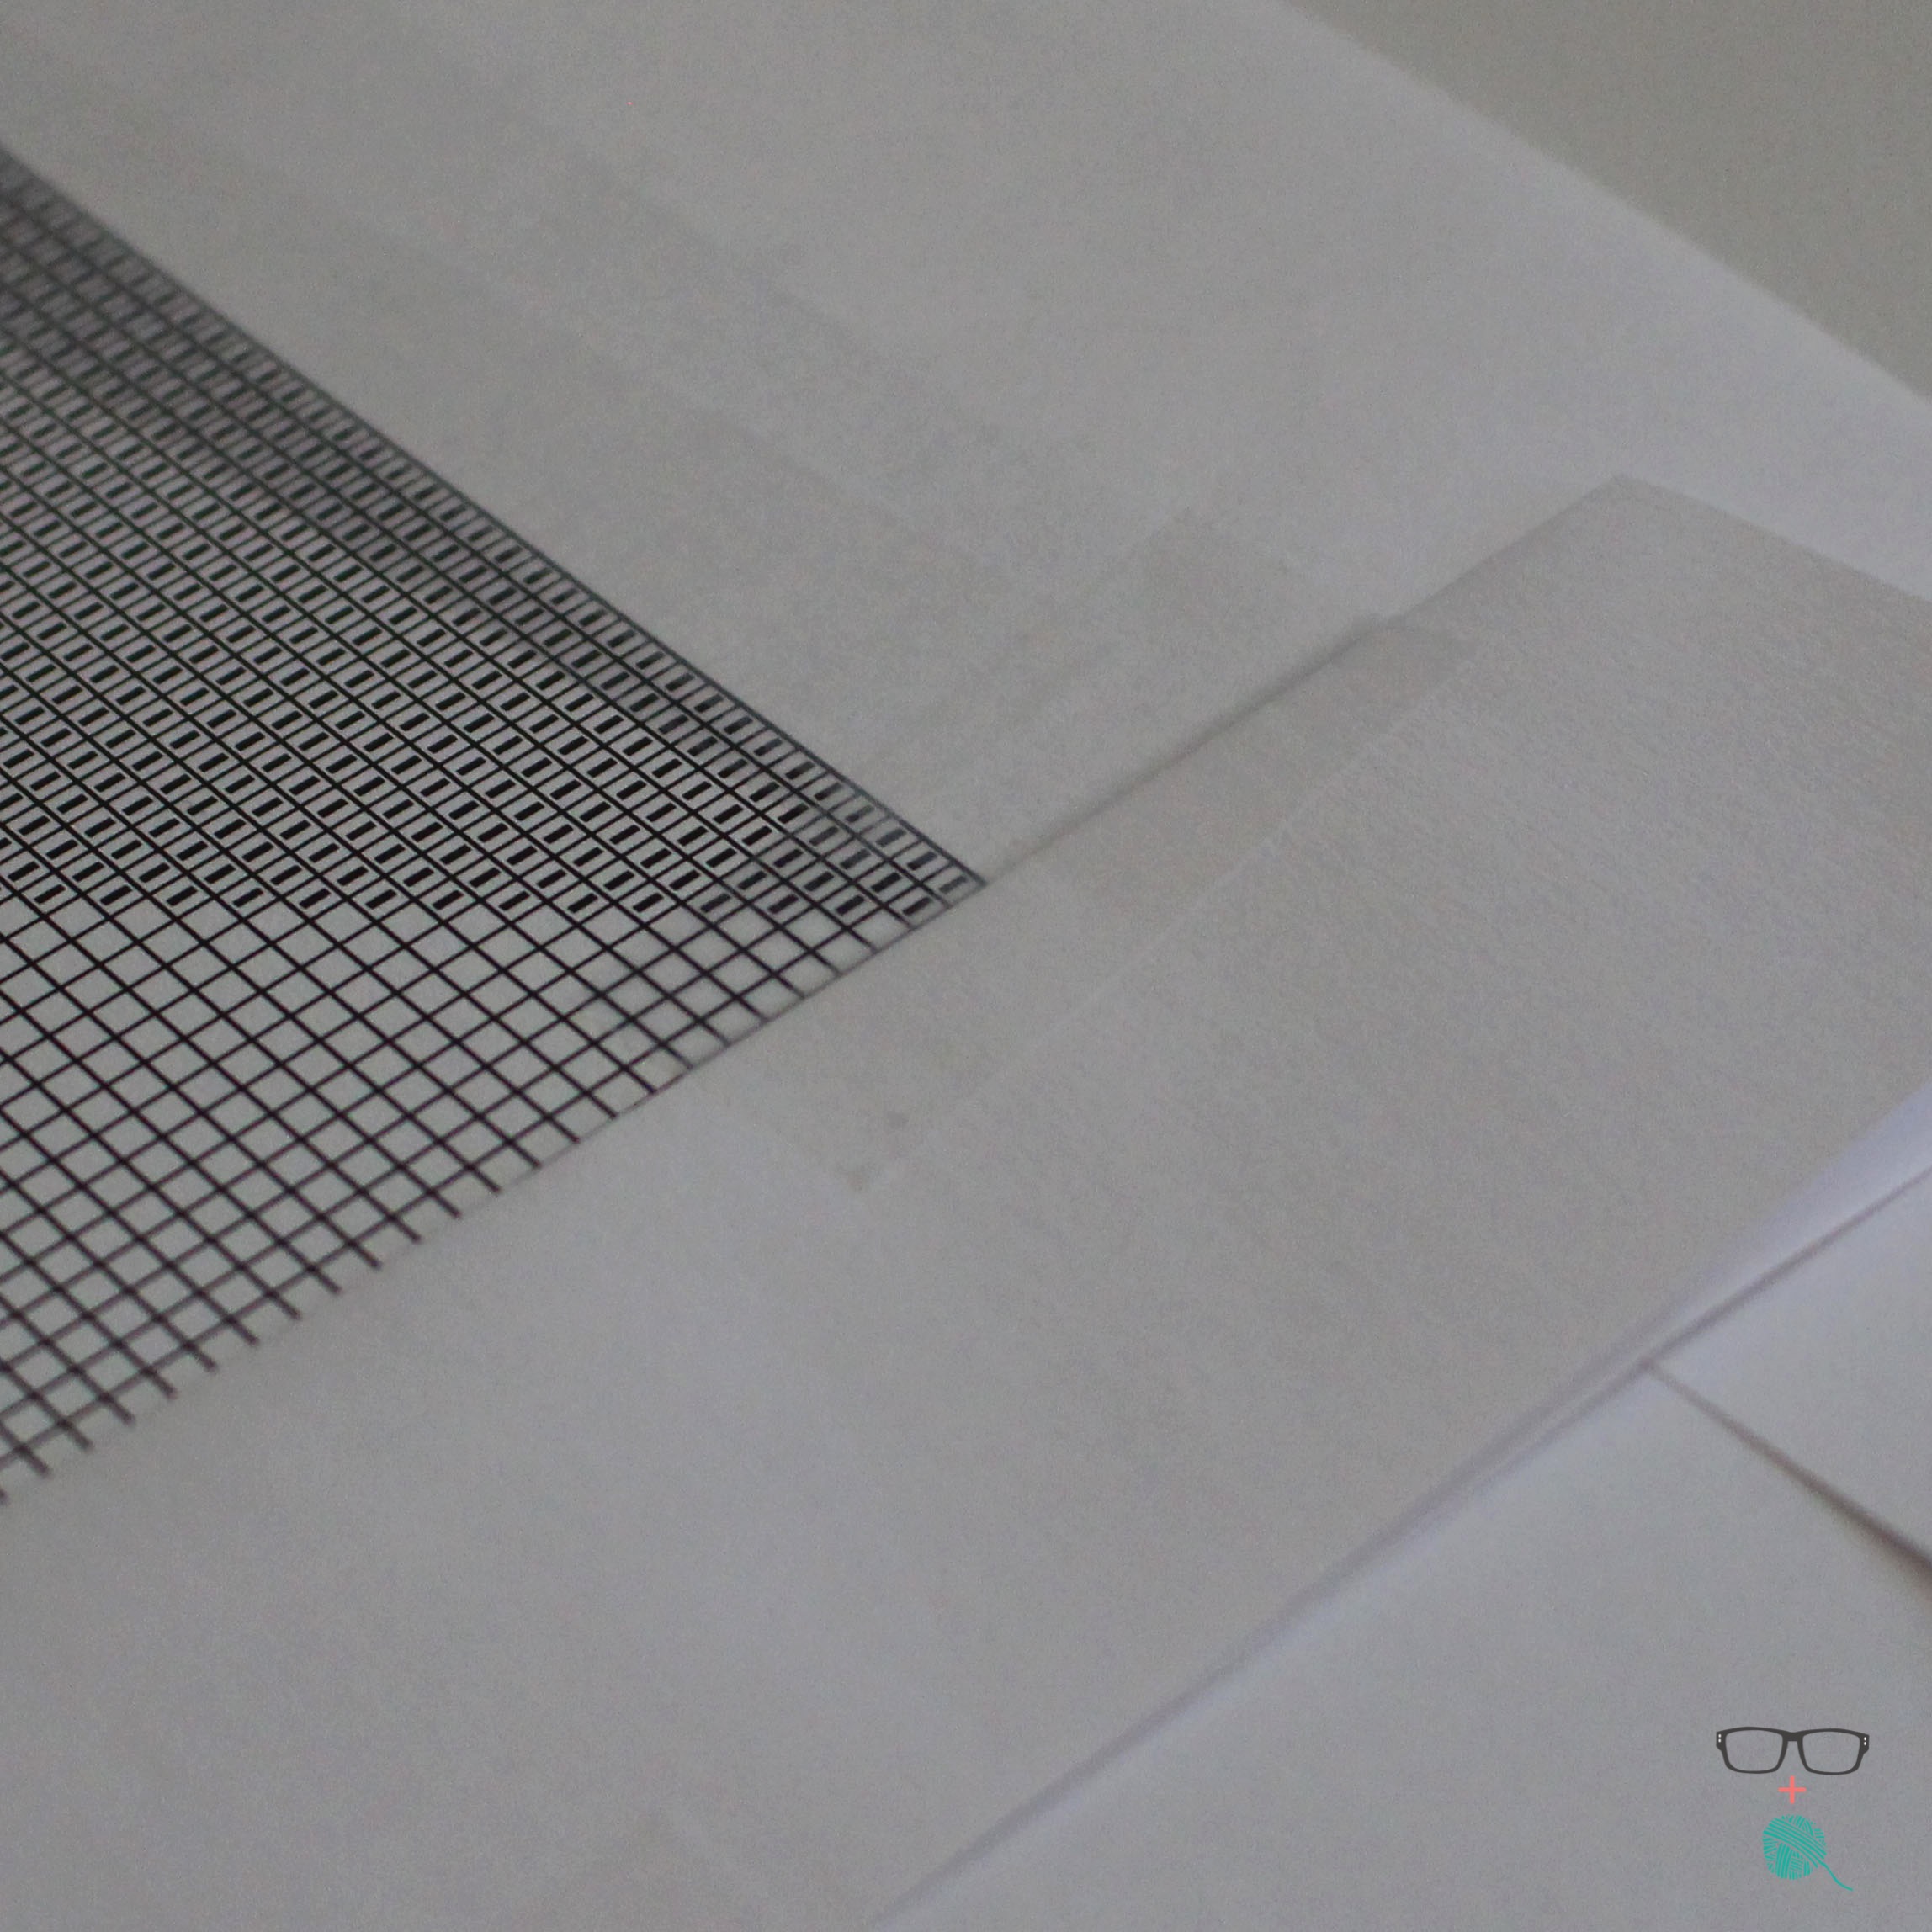
Stitch Gauge
To measure your stitch gauge, you'll want to line up a major marker (in my case I'm using the 3" marker) and measure as large a sample of stitches as your swatch will allow. Click the image to enlarge!
You can see I have 16 sts (each "V" counts as one stitch) between the 3" and 5" markers. To get gauge (keeping in mind that standard gauge measurements are taken over 4 inches) I simply multiply the 16 sts by 2 (since 2 goes into 4 two times) and get a stitch gauge of 32 sts / 4 inches.
Row Gauge
For row gauge we take a very similar approach to that of stitch Gauge. We want to line up our stitches with our ruler and count our rows. In my case, I have 18 rows (each vertical "V" stitch) between the 3" marker and the 4.5" marker. To find out what my row gauge is, I'll divide 1.5 inches (the length over which my rows are counted) by 4 (the target number of inches we want our gauge to be determined over) - the answer is 0.375. So I know that 18 stitches is 37.5% of the total number of stitches. So I'll divide 18 (our original row count) by 0.375 and I get a row gauge of 48 rows / 4 inches.
Did you get gauge?
If you did, well, then pat yourself on the back because we're knitting twinsies! I would hazard a guess, though, that you likely got stitch gauge, not row gauge (or vice versa). If you didn't get EITHER, you have two options: you can pull your swatch apart and go up or down a needle size as necessary (remembering that a SMALLER needle will give you a LARGER number of stitches per inch), or you can work with YOUR gauge, as I have, and follow along in the next section on what to do with your gauge once you have it.
Now What?
So now we have to sort out what to do with our gauge. Whether your gauge matches the pattern or, in my case, does NOT match the pattern, I have a solution for you. The following steps will apply to everyone regardless of what your gauge is.
Using MY gauge as an example (substitute your own gauge in when doing this math): 32 sts and 48 rows = 4 inches in stockinette in the round. Since our pattern is basic and IS worked in stockinette, I just have some simple math to do.
Measure Your Foot: Circumference
When I take a measuring tape and wrap it around the widest part of my foot (which for most people is where your toes meet your instep) I have a circumference of 8.5". I know that the best fitting socks have 1 inch of negative ease. So that means I want my finished sock to be 7.5 inches in circumference. Here's where our math comes in.
7.5 inches (target sock circumference) ÷ 4 inches (our gauge measurement) = 1.875 times.
Now multiply: 32 stitches (our number of sts per 4" of sock) by 1.875 times = 60 sts.
So now I know that to get a sock that fits MY foot at MY gauge, I need to cast on 60 sts.
If, for example, you did get stitch gauge (36 sts/4") per the pattern and your foot is 8 inches circumference, you can safely cast-on the 64 stitches. So not everyone will need to modify!
Measure Your Foot: Length
Another helpful tip when making socks, is to know that the best fit for length on a sock is about 10% of negative length. When I measure my foot, I step down on a tape measure (it's best not to use a flexible tape) and measure from the tip of my longest toe (that's my big toe, but for some folks its their "pointer" toe) to the backety-back of my foot. I say "backety-back" because you want to include the fact that our heel bones (no idea if that's the anatomically correct term for it) sticks out past the bottom of our heel pad (also, probably not correct terminology).
Measurement tip: hold a piece of cardboard (or DVD case if that's all you have handy) against the "backety-back" of your heel so that it meets up with the ruler perpendicularly ensuring you get the most accurate full foot length measurement.
So when I measure my foot from the tippy top of my toe to the backety-back of my foot, it measures 9 inches. At 10% of 9 inches (which is 0.9 inches for those of you hate to do the maths) I have a target sock length of 8.1 inches.
8.1 inches (target sock length) ÷ 4 inches (our gauge measurement) = 2.025 times.
Now multiply 48 rows (our number of rows per 4" of sock) by 2.025 times = 97.2 rows (i'll round up to 93 rows).
And that's the maths!
By going through these simple steps I know that my sock at 60 sts around and 93 rows long (on the sole) will fit me like a GLOVE!
But wait! That's not the gauge in the pattern!
That's a-ok! It's rare that a knitter will obtain the gauge noted in a pattern, especially with socks. Regardless of whether you obtained gauge or not, you'll want to measure your foot to ensure that you're knitting the correct circumference. For example, if your foot is 8.5 inches circumference, as mine is, but your gauge was 36 sts per inch (as per the pattern) I would want to cast on 68 sts since there are no sizes noted in the pattern for a finished size of 7.5 inches circumference. However, rest easy knowing that MOST people knit socks in the sizes noted in the pattern so you're probably going to be able to follow the pattern just as it's written.
If, like me, you're working with a different gauge, there's an easy modification you can do to the charts so that you will still get the same outcome. I've used pieces of paper to block off the sections of the charts I don't want to use but you can use a marker and scribble out what you don't want to see - whatever works best for you.

**Click on the images to see a larger view**
The left hand image above shows that I've taped off the pattern so that I only have 30 sts horizontally showing. I count 30 sts from the right side of the "Left Foot Chart" so that I still see the majority of the triangle. And I tape off the top so that the top left stitch in my workable area is a single purl stitch.
Conversely, on the Right Foot Chart" I start counting from the left hand side of the chart outwards. You want to see a triangle still!
When you tape off the bottom of the work you want to ensure that your starting row in the chart has 2 purl sts (shown in in the right hand image above).
Reference the original pattern to see where the chart repeats begin and end for the original sizes.
That'll About Do It!
I'll post another post later this week with details about the heel. I'll include photos and videos so you're successful with your socks. And by all means, if you have questions, ask them! You can ask them here, on the blog, or you can connect in our Forum in The Unapologetic Knitter's Ravelry Group. If you're on social media use #rijelsnevergonnamakethesesocks (I know it's long but it's funny) so I can see your progress or share them in our Forum. I'd love to see them all worked up. And if you're big on hash tags liek I am, give it a #thekiwipopstudio and #poststitch as well!
I can't wait to knit with you. Let's rock these socks!