
Zoey Cardigan KAL - Week 5
It's Sleeve Week. It's Sleeve Week! (in my head I'm picturing Jim Carrey in "Bruce Almighty"...). It's probably just me.

Anyhoo... now that the body is done it's time to start picking up stitches for the sleeves. I'm going to show you how to start the sleeves for both case of held stitches - with a cable and an interchangeable needle or on waste yarn. I have both instances on my sweater for purposes of example. In the tutorials below you'll also note that I'm using different yarn colors to start each sleeve - this is based on the design with one set of stripes at the top of the sleeve and one set of stripes at the bottom of the sleeve on the other side. Please read the pattern carefully for which sleeve has the stripes at the top and which has the stripes on the bottom.
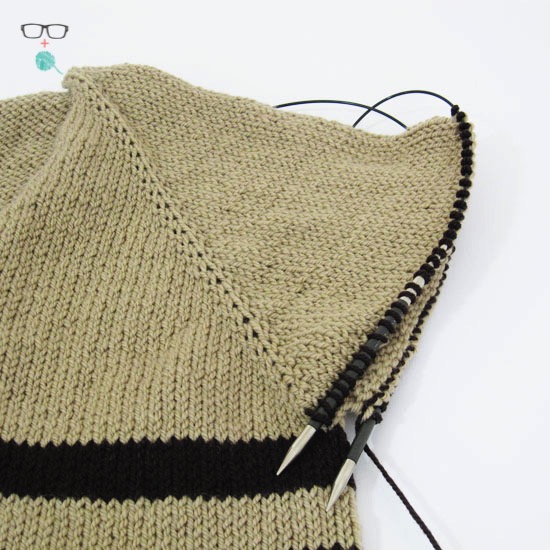
Stitches on an Interchangeable Needle (my LEFT sleeve):
So on my left sleeve I have my stitches on the cable of an interchangeable needle. I know that the left sleeve has the stripes at the top of the sleeve so I'll be using the Stripe color of yarn to start knitting my sleeve.

I have removed one of the two caps on the cable and have attached a needle so now it's just like knitting normally, except when we get to the end of the held stitches we won't use the short needle anymore.
Here's a caveat - even though I wrote the pattern to use DPN's for the sleeves, I don't use DPNs. They are the bane of my existence. I sit in admiration of all you knitters who can use DPNs. Something about them just makes my head hurt so I always use Magic Loop. If you are using DPN's for your sleeves, instead of knitting all the stitches on with your long needle like you see in the picture, use your DPN's, ensuring that you divide the sts evenly over the four needles. For example, for a size Large, I have 60 sleeve sts - so I'd place 15 sts on each needle for the sleeve.

So using our Stripe yarn I'm going to start knitting the first row of the sleeve stripe right off the held stitches needle. It really couldn't be any easier. Once you get to the end you won't need the interchangeable needle anymore and you'll have all your stitches ready to go.
As I mentioned above, I'm working using the Magic Loop technique so I have the first half of the sts on the "front" needle and the second half of the sts on the "back" needle. As you knit the sleeves you're going to notice a big hole under the arm. It's ok. Don't try to close it up now. In next weeks post I'm going to show a video on picking up the stitches to close the gap.
Sleeve Length Maths!!!
The sleeve length in the pattern is based on industry standards for "average proportions". I HIGHLY recommend you measure your arm and make sure you know your target length for the sleeve is - measure from your underarm to your wrist. I'll bet you almost anything it's not the same as what's in the pattern. I, for example, am known as T-Rex arms. I need to knit a size large because I'm curvy, but I'm also short... and therefore have proportionally shorter arms. Like way shorter. I need my sleeve to be 16.5" rather than 18.25" as the pattern calls for on a size Large.
Since we'll want both sleeves to be the same length once we're done knitting, we can bring some math into the equation. Sure, you could use a tape measure and measure every so often but it's not particularly accurate. I rely on math as often as I can when I need things to be the same... like the exact same.
So, as an example: my arm, measured from the underarm to my wrist, is 16.5". If I divide 25 rows by 4" (since my row gauge is 25 sts over 4") and then multiply that by 16.5" I get 103 rows (I rounded down from 103.126).
Knowing my target sleeve length, I can figure out how many sts I need to decrease, where to start the stripes on the second sleeve (shown under the Right Sleeve section below) and how many rows our Cuff color we need. Stick with me here.
I know, for example, that I want my cuff to be 5". At 25 rows / 4" I do the math and find out that I need 31 rows of cuff. I'm going to add my 1 bind off row to that so I'll make my total cuff 32 rows long. So 103 total rows minus 32 cuff rows = 71 rows. This means that all of the shaping of the sleeve that happens before the cuff has to be done over 71 sts. BUT!!!
In addition to the cuff, we have 6 rows at the top of the sleeve that have no decreases in them. So 71 - 6 = 65 rows. So THAT'S the number of rows we have to work our decreases over: 65!
With that in mind, we now have juuuuuuuust a bit more math to work out. I start with 60 sts at the top of my sleeve and have to decrease to 36 sts for the cuff. If we subtract 36 from 60 we get 24 sts to be decreased. Because we work decreases in pairs we then know that we have 12 decrease rounds that need to be worked (24 divided by 2).
If we divide 65 rows of sleeve by 12 decrease rows we get 5.416... which we're going to round down to 5 rounds. This means we're going to work a decrease round every 5 rounds over the 65 rows of our sleeve. That also means that by row 60 of the 65 needed (because 12 x 5 = 60) we'll work 5 rows even before we start the cuff ("even" simply meaning with no decreases).
Here's a recap so you can do the math to figure out your total sleeve details:
Total sleeve length = 103 rows
Total cuff length = 32 rows (including bind 0ff)
Decreases worked very 5 rows
Knit 5 rows even before starting the cuff.
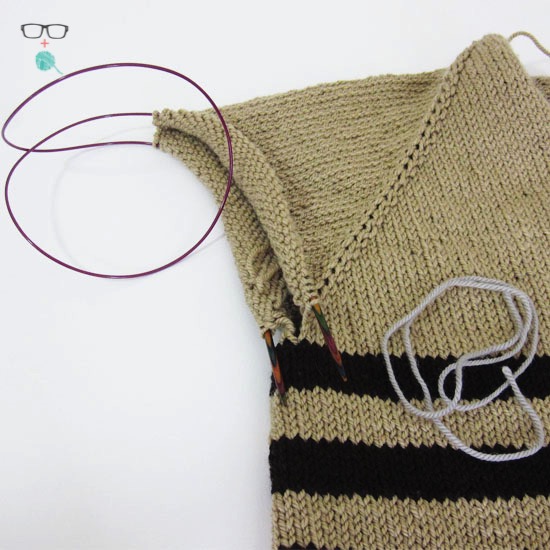
Stitches on Waste Yarn (my RIGHT sleeve):
Moving on to the right sleeve, where I have stitches on waste yarn.

In this case, we're going to have to pick up all of the live stitches off the waste yarn and place it on to a needle. Grab a nice long needle to hold all the stitches if you're going to work Magic Loop, or use your DPNs right away - though I do recommend, if you have them available, grabbing a smaller needle than the one you're knitting the sweater with. Here's a video to help.
Once you have all of the stitches picked up and on your needle you can pull out the waste yarn. It should just pull right out.
The Right Sleeve Maths
Using some of the math from the left sleeve above, you have a bit more work to do on this sleeve since the striping comes at the bottom of the sleeve. It's much simpler, however, now that you've done the work above.
I know that my sleeve, before the cuff, needs to be a total of 71 rows. The shaping will be worked the same (knitting 6 rows even, then starting the decreases every 5 rows) so that's easy. What we DO need to know is when to start the bottom stripes.
71 total sleeve rows minus 30 rows of stripes (because we have a total of 5 stripes with 6 rows in each stripe) is 41 rows. So I know, now, that once I reach 41 rows from the first row of the sleeve, that I will start my first stripe.
TIP: Before you start the Right sleeve, clip a removeable marker into the first row of the sleeve so you know how many rows down to knit before the stripes.

So knit your sleeves and then totally try on your sweater. You'll love it! Next week we'll wrap things up with the front band, closing up the holes under the arms and then blocking the sweater. And yay you! You're almost there!
Stay in touch!
To stay in touch with me and the other folks participating in this KAL, join our group on Ravelry, tag me on Instagram and use #zoeycardigankal and #unapologeticknitter.
And by all means, if you have questions, email me at meaghan@unapologeticknitter.com or message me on Rav (SoCalMeaghan), leave a comment here, or leave questions in the Discussion board.
**NOTE**
To make sure I see any immediate questions or concerns on Ravelry please be sure to ear-burn me (despite me being the owner of the discussion board, I don't get notified when people comment unless I'm tagged). So, if it's urgent, please be sure to ear burn me.
To do this enter my username in square brackets and follow it by tying the word "person" in parenthesis: [socalmeaghan](person).
Happy Knitting!!!